Alexa can now read you your email
We live in a world with way too much email. We’re inundated with newsletters and offers and, occasionally, some important stuff. But we’re all just trying to achieve that wonderful inbox zero life.
Amazon wants Alexa to help just a little bit, and last year updated the assistant with the ability to check and read you your email. It can even respond with a fancy signature, should you choose. But how exactly do you get Alexa to check out your email? Let’s go through it.
Setting up your email with Alexa
The first thing you’ll need to do is open up your Alexa app. Then…
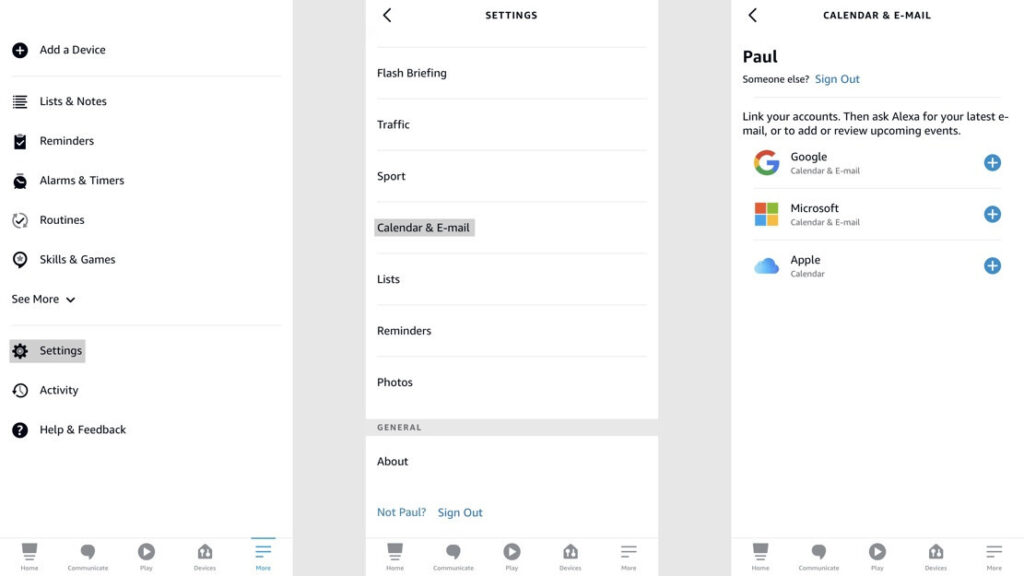
- Tap More in the bottom bar.
- Choose Settings.
- Scroll down and select Calendar & Email.
You can add an account or you can choose an account you’ve already set up.
If you’ve previously set up your calendar with Alexa, you’ll see those accounts here. If you haven’t, you just have to tap the little plus icon and follow the steps to sign in.

You’ll have three options here, but only two of them are available for email. You can only sync your Microsoft and Google email accounts with Alexa. Apple is on the list but it’s only available for calendars.
When you click on an option, you’ll have to enter your credentials. You’ll be warned that you’re giving Amazon access to your emails, but we’ll get to that in a bit. Once you put in your credentials you’re all done.
If you had already set up your Google or Microsoft account previously, setting things up is a little different.
1) Go back to the Calendar & Email section of Settings.
2) Click on your account.
3) Under Email Settings, tap Link email account.
4) Enter your credentials.
Boom, you’re done. Now, when you click on your account in the Calendar & Email section of Settings, you’ll see a new option: Signature.
If you toggle this on, any email you send with Alexa will include a line that says “Sent via Alexa”. It’s like the now-infamous “Sent from my iPhone” signature you see from iPhone owners, but for Alexa.
There’s one more thing. In the Calendar & Email screen, you’ll also see an option called Email Security. If you toggle this on, Alexa will ask you for a four-digit voice code that you’ll need to use before you can do anything with your email.

Using Alexa to read and send your email
To get started using Alexa to read your email, simply say “Alexa, read my email” or “Alexa, check my email”. Once you do that, Alexa will give you a quick glance at how many unread emails you have. It’ll also tell you if any of them are marked important.
Then, Alexa will start going through your emails, telling you who sent it and what the subject line is. You’ll then be given a number of options after it tells you about the email: Read, reply, archive, delete or skip to the next email.
When you do choose to reply to an email, Alexa will ask you what you want to say. Just say what’s on your mind and then Alexa will read it back to you. It’ll then ask if you want to send it off, which you can obviously agree or disagree to. It doesn’t appear that there’s a way to manually send an email to anyone. You can only respond to emails sent to you.
One thing to note: Once you’re done with an email, Alexa will automatically move to the next one. If you’ve got a lot of unread emails – I had 108 when I tested this – it can get very tedious very quickly. There is something a little more important that we need to talk about.
What about privacy?
Ah yes, privacy. When you enter your email credentials, your email provider will warn you that you are giving Alexa, and Amazon, access to your emails. What exactly happens to your emails? Amazon has stated your contacts and emails are stored in Amazon’s cloud.
However, the information is encrypted and securely stored on Amazon’s servers. Amazon only reads your emails when users ask Amazon to do so or for security or compliance needs. For example, if it needs to investigate abuse or some kind of bug.


