Learn to control restricted content and tweak your settings
If you have kids, and you have a Google Home – or any smart speaker, for that matter – then chances are your little ones have become incredibly curious about the robot sharing their home. It’s something we’ve discovered ourselves.
It’s why the companies building these speakers are starting to pay more attention to the relationships children have with this technology. There are plenty of games already available on Google Home for kids to enjoy, but, as a parent, you may have some concerns about how your little ones are interacting with these speakers the rest of the time.
Read this: How to set up guest mode for Google Home speakers
Amazon’s answer to this is the Echo Dot Kids Edition. Google doesn’t have a kid-friendly speaker (yet), but there are ways to control what your kids can do with Google Home. It’s going to be largely the same as the adult-rated experience, but there are a couple of tweaks you can make to stop them causing mayhem – or accessing things you don’t want them near.
There are now a few different ways of doing this, and we’ll walk you through all of them. One involves giving them their own Google account and personalised (but restricted) access to Google Assistant. The others involve setting up Digital Wellbeing and Pretty Please, or just making a few tweaks to the Google Home settings. Whichever sounds like it will suit you best, read on below for all the details.
1. Set up Family Link

One option is to give your child their own profile, so that Google Home will recognise their voice. To do this, you’ll need a second Android device to create your kid’s account on, but you can do all the management from your main iOS or Android smartphone. The second device is just for the setup; once you’re done, you won’t need to have it switched on.
To make a new account, you’ll need to first download the Family Link app on both your smartphone and the second phone you’ll be using. From there it will guide you through the setup process. It’s a little fiddly, requiring you to create and sign-in a new Google account on the second device, followed by a pairing process, but it didn’t take us longer than 10 minutes.
Once you have the second device running the child account, you want to do the following:
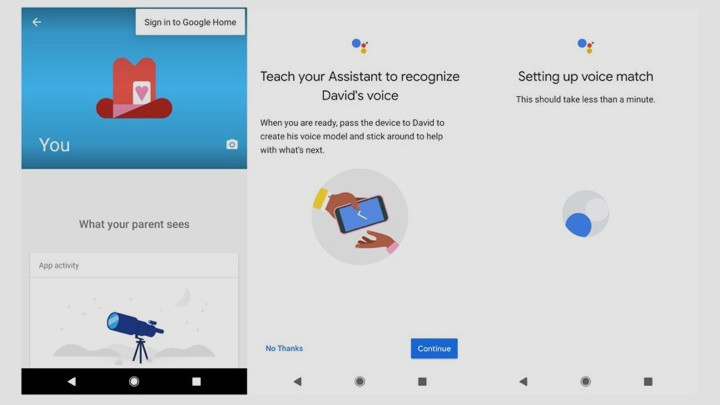
1. Tap the icon at the top right and make sure you’ve selected their account.
2. When you’re on the child page, tap the three dots at the top right and hit ‘Sign in to Google Home’.
3. Walk through the setup. Here you can choose which devices will be able to recognise your child’s voice – and which won’t.
4. Once you’ve built your voice model, you’re all set to go.
Once you’ve linked your Google Home, you’ll see it appear in your smartphone. Tapping on it will let you make a couple of changes, the most notable being the ability to turn off personal results (which also restricts payments, but there’s another way to do that which we’ll get to).
You can also restrict your child’s access to third-party apps. To do this:
1. Open the Family Link app on the parent phone and tap on Manage Settings.
2. Tap on Google Assistant.
3. Toggle ‘Third-party apps’ to off.
2. Turn on Digital Wellbeing

Google’s Digital Wellbeing tools could be very handy to parents who have Google Assistant smart speakers and smart displays in the home.
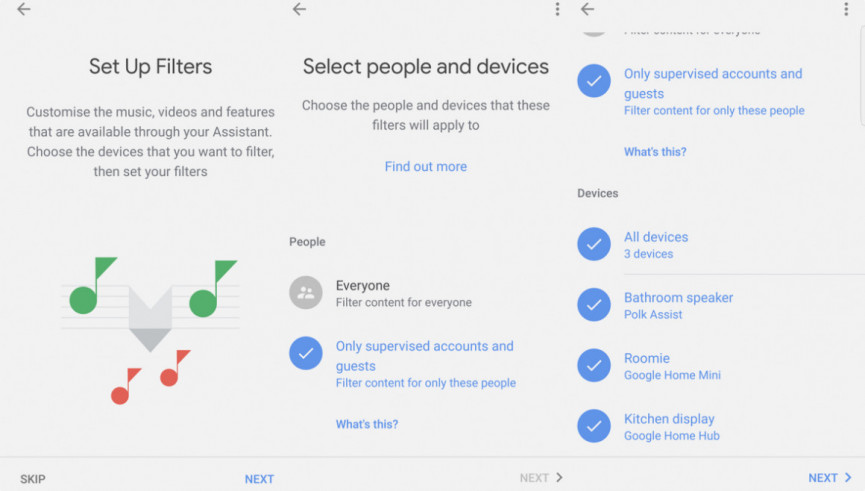
We’ve written a separate guide on how to get started, but essentially this allows you to get easily set up with content filters for music, video and Assistant queries (which uses Family Link above and YouTube Restricted Mode below).
You can also set up Downtime, a sort of Do Not Disturb mode that means you can’t interact with the Google Assistant at certain times, on certain days, and it can only be re-activated from the Google Home app, not by voice.
3. Set up Pretty Please
Google has now officially rolled out Pretty Please, a feature that will require children to be polite to the Assistant. If kids don’t request things with a “please” or “thank you”, the smart assistant won’t perform the action.
However, if kids do abide by Google’s manner laws – say, you ask, “Ok Google, please set a timer for five minutes” – it’ll respond with something like, “Thanks for asking so nicely. Alright, five minutes. Starting now.”
We’re still waiting for this to reach our devices, but you can bet on this being available through Google Family Link and through the settings sections of both the Home and Assistant apps when it lands. As with anything Google, setup should be fairly self-explanatory once you find it, and you should be able to select which devices require the new standard.
4. Turn on YouTube Restricted Mode
If you’re in the US or Australia, you’ll have access to YouTube Music. Of course, that opens up the potential for kids to play DJ with a lot of songs containing content you might not want them hearing. Here’s how to restrict access to songs that Google deems to have “inappropriate content”.
1. In the Google Home app, hit the Menu bottom at the top left corner.
2. Tap on More settings.
3. Select the device you want to put the restriction on.
4. Scroll down to where it says YouTube Restricted Mode and toggle it on.
We can’t guarantee this will filter out everything, but it should minimise the likelihood of any explicit content making its way out of your Google Home and into your kid’s ears.
5. Put restrictions on Google Play
If you’re a Google Play user (or your Home defaults to the streaming service), then you may want to do the same thing.
1. Head to the Google Play Music site and sign in with the account used on your Google Home.
2. Hit the menu button at the top left and click on Settings.
3. Scroll down to the ‘General’ section where you’ll see an option to ‘Block explicit songs in radio’. Tick the checkbox and you’re sorted.
6. Toggle off Pay with Assistant
Here’s one you’ll thanks us for. Google lets you pay for things using Assistant, which can be super handy – and super risky with kids running around, treating Google Home like their personal Santa. To turn this off, do the following:
1. Open the Home app and select Settings for the speaker you want.
2. Scroll down and tap on More.
3. Tap on Payments then simply toggle ‘Pay with your Assistant’ to off.


