


We'll get you familiar with the tools for your Apple smart home
If you’re not already using scenes and routines, are you really living in a smart home? All of the major platforms, including Alexa and Google Assistant, support them, as does Apple HomeKit.
Specifically, Apple has “automations” and scenes, but automations are really just routines as you probably already know them. And the good news is that creating both is super easy. The hard part is applying your imagination and coming up with interesting ways of using them.
How to automate with: Alexa Routines | Google Assistant Routines
Whether it’s having your lights turn on when the sun goes down, or having Siri lock the doors and power down the house at bedtime, you can make it happen with HomeKit’s automations and scenes. In this guide we’ll walk you through setting them up, but first, a little on what you need.
What you’ll need
To do any of this, you first need a HomeKit hub. This can be a HomePod or HomePod Mini, an Apple TV or an iPad (but an iPhone won’t work).
You can read our full guide on how to set up a HomeKit hub, so we won’t go too deep on it here, but it’s pretty easy to do. Each has its advantage: the iPad is portable (but runs on a battery), the Apple TV is always plugged in, and the HomePod is always on.
However, once you have the hub set up, you can control all your HomeKit devices, scenes etc. on your iPhone, or even an Apple Watch, as the Home app will give you all the controls.
As long as your iPhone or Watch has a data connection, you can send an action through the Home app and your hub will pick it up over the internet, giving you remote control.
How to create HomeKit automations
So we’ve established that you have a hub. Time to start creating. Whereas scenes let you create many actions across your home at once, automations involve events or actions triggering other actions. For example, you could create an automation where unlocking the front door turns on your hallway lights and adjusts the thermostat.
All automations are made in the Home app. So to get started, open it up and tap the Automation button at the bottom right side.
If this is your first time, there’s a helpful big yellow button in the middle that reads Create new Automation, otherwise you need to tap the + symbol in the top right corner.
Read this: The best HomeKit devices for your smart home
You’ll then see the five different trigger types for automations: people arrive, people leave, a time of day occurs, an accessory is controlled (for example, a light turns on) or a sensor detects something.
The first two are controlled by the Home app determining the location of your iPhone (you can also do this with a cellular Apple Watch in your iCloud settings). The rest rely on other conditions being met, be that a time of day or an event like a motion sensor detecting movement, or a light being switched on.
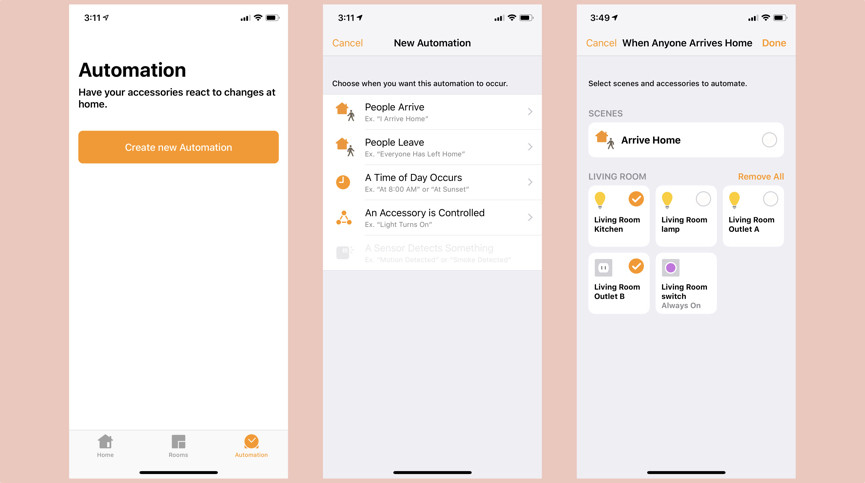
For demonstration purposes we’re going to create a basic automation for when we return home. So we’ll tap the People Arrive option and then we need to set the conditions. The action is set so it will happen when it detects my iPhone is at the location of ‘Home.’
But I can tap on this and choose any location, which can be done by entering an address in the search bar. There’s also a handy map at the bottom that shows my GPS location in proximity to ‘Home’.
Automations get more clever the more sub-conditions that are available. In this example, I can also set the time of day I want this automation to occur. I’m creating one that turns on a couple of outlets and switches on my lights, but I don’t want this to happen if I come back home in the middle of the day, right?
By selecting Time I can choose to set specific time perimeters in which I’d like the automation to happen. Alternatively, I can select At Night and then tap on the information button that appears to put restrictions on it. I’m restricting it to 15 minutes before sunset and ending it at sunrise.
Head to the next screen and you can select the accessories you want included in the automation. I’m just using outlets and lights for this, but you could have a heater turn on, or adjust a thermostat. If you’ve already created any scenes, you can also make them part of this. In fact, you may prefer to simply use automations to trigger scenes.
Once that’s done you can make adjustments to the specifics of how each accessory will behave. For example, a long press on any lights will let you set exactly how bright you want them to come on.
You’ll also see an option for Turn Off. This is pretty handy, as it lets you switch off all of the HomeKit devices after a specific period of time. This is set to Never by default, but you can adjust if you like. A good example could be a porch light you’d only want on as you arrive, but would like it to turn back off after a couple of minutes.
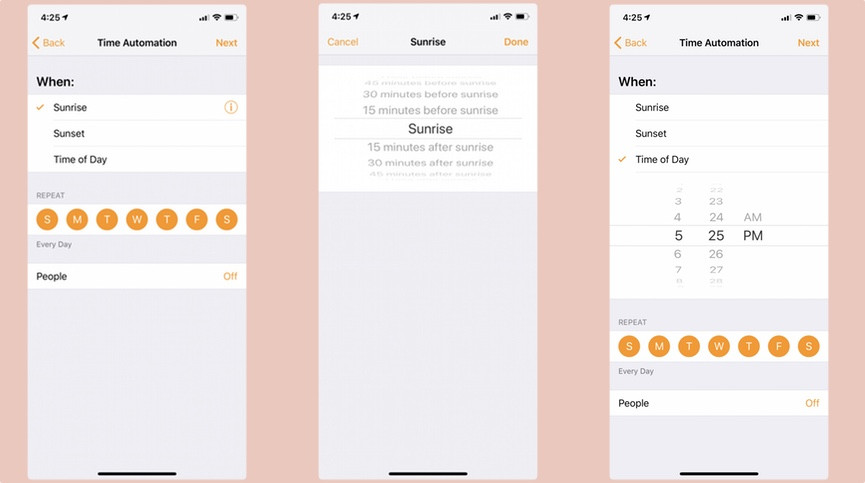
The other automation “types” follow a similar procedure. For a time-of-day automation, you can select not only the time but also the days of the week you’d like it to occur. So you could trigger a scene at 4pm every Tuesday, if you like.
For accessory automations, you can create a chain where turning on one device will trigger a bunch of others. I built one where turning off my bedroom light after 10pm will turn on a fan, because it’s hot right now, but I also don’t want it turning on earlier in the day when I’m not actually in bed.
How to create HomeKit scenes
Scenes are simply scenarios where you’re adjusting the state of multiple devices at once. That might be a morning scene where your bedroom and hallway lights turn on, the thermostat cranks up the heating and your smart shades go up – all in one fell swoop. Or maybe a movie scene that dims the lights, but only those in the living room. Scenes can be triggered by you asking Siri (see below), tapping the scene on your iPhone or Watch, or through an automation.
To create a scene, open the Home app and from the overview page, tap the + icon at the top right. Then tap Add Scene.
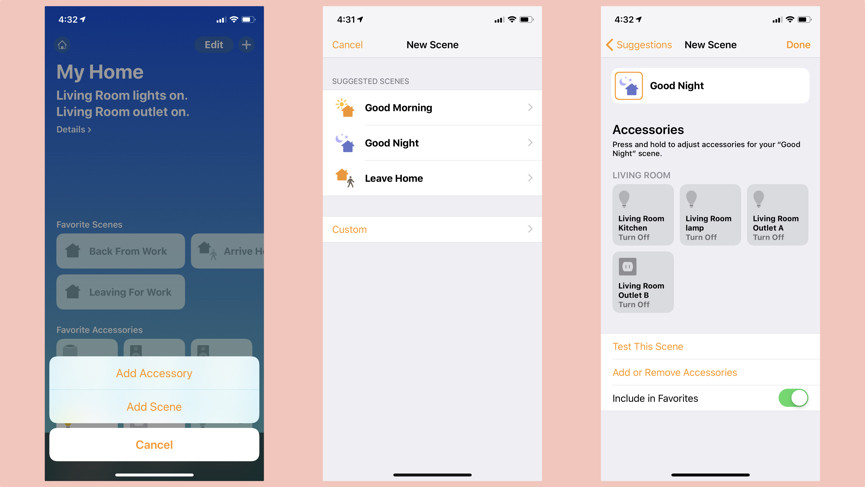
Apple will give you some suggestions here, like a good morning scene or a scene for when you leave the house. These aren’t just suggested names either, as if you select one you’ll see it’s created a full scene based on your devices. But you don’t have to go with these: below you’ll see a button called Custom, which lets you build a scene from scratch. Let’s go with that one.
First, you need to create a name for your scene. Keep it simple and sensible, especially if you’re going to make a lot of scenes, else you’ll risk confusing yourself down the line. We’re going to make one called “Back from work.” Pretty self-explanatory.
Once named, your scene needs some accessories – so tap Add Accessories below. You’ll see a list of all your HomeKit devices that are currently connected. Choose the ones you want to control in the scene, then tap Done. On the next page you can set the specifics of how you want each accessory to behave. We want our living room lights to come on, but not all the way, so we can long press on each individual bulb and set them to 70%.
You’ll also see a toggle for Include in Favorites. Your favorites appear on the main dashboard, so any scenes with this enabled will appear there above your accessories.
Controlling scenes with Siri
As well as controlling your scenes through the Home app or triggering them with automations, you can get Siri to do it without lifting a finger. Siri will recognise the names of your scenes (again, why it’s important to name them sensibly). You can simply say, “Hey Siri, start my Back from Work scene” to trigger it.
Check out our full guide on essential Siri commands for controlling HomeKit devices.


